I also intend to add artwork to the walls, but art is very personal to me so that will happen very slowly over time. In 5 years I've only found the one picture I wanted to put in there (and still haven't painted the frame, haha).
Before:
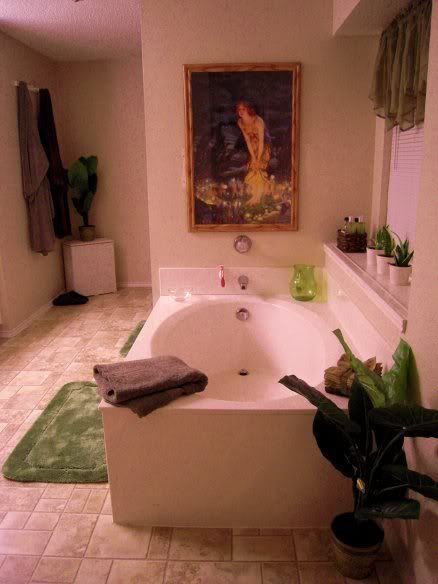
After (same view)

Hanging screen courtesy of The Container Store, 4 panels per pack at $10. I ordered some black ones of a different design for my Master Bedroom project (backordered, not in stock yet). These also make an appearance in our Media Room in a different manner. The panels are plastic so easily cleaned and no problem using them in a humid environment like the bathroom. I wanted a little privacy as the bathroom door, and view of the tub, are in a direct line with the bed in our bedroom.
Alternate view of the bathtub area:

What I dislike about the window is that it doesn't open. It's functionally useless. At a later point I will replace the blinds with 2" white plastic ones. You can see here a little better the different color that I have used for the walls. The cheap wooden frame on the painting I intend to paint in the off-white color of the tub and trim.


This tower is something I'd like to replace, but I'm not yet sure with what. The top bin holds miscellaneous things like sunscreen, sunburn lotion, and washcloths; second bin holds my hairdryer, hair styler, and a huge selection of Curlformers (which are awesome); the large open section holds our towels, the next bin down holds my huge collection of nail polish and related nail care products (these are shared between me and my two daughters); the final bin at the bottom holds first aid supplies like larger bandages and wraps, splints, and such.

This is a four drawer dresser - the top holds medicines; the second drawer holds small containers of hairbands for DH, my face cleaning products (eye in one, face in a second), DH's facial care products; third drawer holds my makeup overruns (a company I loved, Aromaleigh, went out of business and I stocked up. It's minerals so will never go bad, and I don't intend to get rid of any of it - it's not replaceable. It will, over the next few years, get used up) and feminine products and extra TP rolls; the bottom drawer holds razors and shaving cream.
Anyone have suggestions on what to do for storage replacement? The kids bathroom only holds extra shampoo in terms of stockpiling; my closet has shelves at the entrance that hold hair dye overstocks - I'd love to get these centralized with the rest of "the stuff". A different vanity will help a lot, but won't hold everything. I've considered the "ladder style" shelving where the current dresser is with pretty baskets, each one defining the limits of the "stockpile" of that particular item. I'd love some alternative suggestions, though.
Ones that don't require "get rid of X" - these things will ultimately get used up and are used on a daily or weekly basis. I have dramatically slowed my stockpiling and imposed limits on it, and some things (like the Aromaleigh) will eventually dissappear entirely.
Also, I do not like unconcealed storage for these types of supplies, so no hanging shoe organizers of items or the like. I'd love to hang my hairdryer and such on my vanity door, but the current vanity doesn't allow that (the wood is only 1/16th" thick to hang from O.o) - although maybe Command Hooks would work?